For several years, researchers from the National Institute for Occupational Safety & Health (NIOSH) have used panoramic pictures to study how mine workers visually search for hazards at stone, sand and gravel mines.
Panoramic photos typically are at least twice as wide as they are tall, and they offer several advantages over traditionally formatted pictures when used for training. The wide field of view of these pictures more accurately simulates the real-world environment that mine workers experience at a jobsite.
The extra visual information in a panoramic picture also provides mine workers with the context and spatial reference necessary to properly interpret hazards, levels of risk and ways to mitigate them. Despite these advantages, panoramic pictures can be challenging to use as training tools due to the need for specialized software to pan and zoom the large-format pictures.
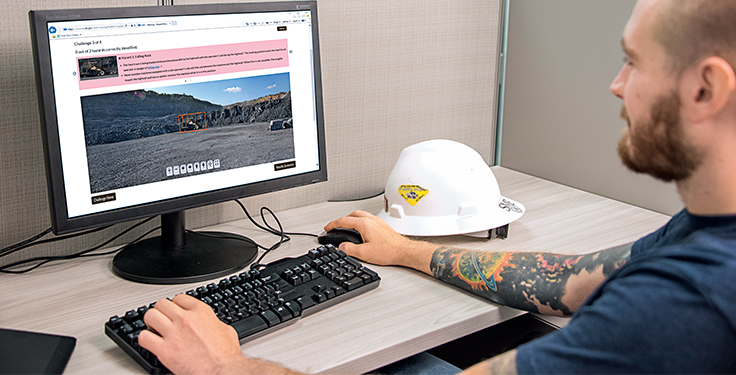
To address this need, NIOSH released a beta version of EXAMiner – a software tool for safety trainers to simulate a workplace examination during training using panoramic pictures. The software provides 31 panoramas of a surface stone operation with hazards in each picture representing realistic dangers to mine worker safety or health, and it gives trainees the opportunity to perform a virtual workplace examination and practice searching for hazards.
In each panoramic scene, trainees scan through the picture and identify hazards with a mouse click. After identifying hazards, the trainee moves on to a debrief screen that displays each hazard, whether they correctly identified them, and additional details about the hazard and potential mitigation options.
The EXAMiner software also gives trainers the ability to import their own panoramic pictures to create training materials that include site-specific hazards unique to mining operations. Improving site-specific hazard knowledge will better prepare mine workers to recognize hazards when they are present.
To take full advantage of this feature, we’ve developed some considerations for trainers to prepare before going onto a site, as well as how to effectively capture panoramic pictures and easily transfer those images so they can include them in their training curriculum using EXAMiner.
Preparing to take panoramas
Storytelling is a tried-and-true training method, and a good picture tells a story.
Every story has a beginning, middle and end. Capturing a picture of the story in the middle is compelling because it prompts the trainee to consider the events and decisions leading up to this moment, as well as project how the story might end.
In the case of hazard recognition, the story could have a safe or tragic ending depending on many factors, including the likelihood of a resulting accident, the severity of the resulting accident, and whether and how the hazard is corrected before an accident can occur.
Additionally, considering the events leading up to this point also prompts trainees to think about what they should do at their worksite to avoid these circumstances in the first place. Tapping into these thought processes makes a well-designed picture very engaging and effective as a training tool.
Advanced preparation before taking panoramic pictures increases the likelihood of success in capturing hazards that are critical to mine workers and ensures minimal interruption of production. The following tips detail how to create relevant and realistic scenes while taking into consideration logistics such as personnel and equipment needs and production demands:
Identifying hazards critical to workers. Every mine site experiences critical site-specific risks and hazards, and trainers have several data sources available to them to identify which hazards to include in potential panoramic images.
Downloading EXAMinerA beta version of the EXAMiner software is available on the NIOSH Mining website at cdc.gov/niosh/mining/works/coversheet2050.html. For more information about the software, contact Brianna Eiter at beiter@cdc.gov |
The Mine Safety & Health Administration (MSHA) provides a plethora of potential data that trainers can use to determine which risks and hazards mine workers are missing during workplace examinations. This includes industry-wide accident and injury data, site-specific accident and injury data, and recent citations.
Trainers can also look to daily inspection forms such as workplace examinations and maintenance logs to identify potential ongoing or systematic hazards. Also, trainers can consult with frontline supervisors, mine workers and on-site contractors, or they can shadow the competent person who is performing a workplace examination to identify critical hazards.
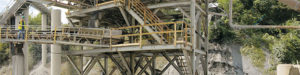
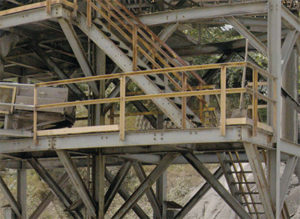
Choosing the location. Location is both the work environment (the primary crusher, the dumpsite, the scale house, etc.) trainers would like to capture in a panoramic picture, as well as the physical place the picture is taken. Trainers should be able to identify the location of the work environment as they determine the critical hazards.
Planning where to stand to take the picture may take some trial and error to select the best location and create the right mix in terms of picture composition. For example, foreground or background equipment might be critical for context of the depicted hazard.
It is important to find the right place to capture a panorama from a safe location that includes all of the desired elements. In addition, the large format of panoramic pictures can result in the intended subject being too small in the final picture. Once a plan is in place, trainers can practice taking panoramas with a smartphone or tablet.
Staging the scene. When planning panoramic pictures, it’s important to take into consideration details about the people and equipment needed to stage the hazards included in the scene.
Trainers need to know who is working in the area and what equipment is available at that site. For example, the trainer can place an extra wheel chock on the ground near a vehicle to show that the vehicle is not parked properly, while a second chock can be out of sight on the far side of the vehicle but in proper use to ensure safety.
Using props in this fashion will help create realistic pictures and reduce the need for editing the pictures later using software. Taking the time in advance to determine who should be in a picture, what task they should be performing, or what piece of equipment they should be operating will decrease setup time and minimize disruption to normal operations.
Capturing panoramic images
EXAMiner gives trainers the opportunity to create site-specific training materials. The software was designed for trainers to use what they currently have available to them – a smartphone or tablet – to take panoramic pictures to incorporate into their training.
Fortunately, taking these pictures using a modern smartphone or tablet is relatively simple, as newer Android and iOS phones and tablets include panoramic photo options in the standard camera app.
To enable the panoramic option on Android devices, users simply need to open the camera app and swipe from the left side of the screen toward the center. To enable the panoramic option on an iOS device, users scroll along the bottom menu until they center the word “PANO”.
After enabling the panoramic option, taking a panoramic picture requires the user to move the camera to capture the intended scene – but how they move the camera will affect the quality of the final picture. A few key considerations to follow:
Users should move the camera slowly and steadily to keep the picture sharp. The camera takes numerous pictures as it rotates, and then the camera software stitches these images together to create the final picture. A slow and consistent rotation provides the software with higher-quality input that will translate into a higher-quality final picture. The panoramic picture software may fail outright if a user moves the camera too quickly.
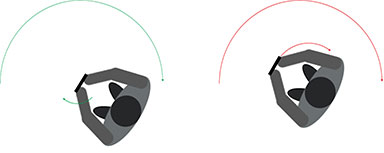
Users should aim the camera at the horizon and maintain this orientation to keep the picture level. In addition, holding the camera at eye level will create a final picture that gives viewers the impression they are standing in that location. In some cases, panoramas from a higher or lower vantage point may be necessary or desirable for training purposes. But they will not provide this same sense of perspective.
Users should pivot the camera around its center to keep the picture seamless. Objects near the camera will appear to shift more relative to objects in the background if the camera is pivoted around some other axis – for example, if users hold the device in front of them and pivot around their feet.
Unless there are no nearby objects in the foreground of the scene, the resulting picture will likely have “seams” where the camera software cannot compensate for the mismatched movement. The ideal configuration would be to use one of the many inexpensive mounts that are readily available on the market to allow the camera to pivot on a stationary tripod.
Trainers should practice taking pictures ahead of time using these guidelines and view the pictures on a computer display to verify they are capturing good results. Understanding how a particular camera works can eliminate frustration and delay when taking panoramic pictures at the work site.
The camera shutter button starts the image capture, and pressing it again can end the capture before a 360-degree rotation is completed. Panoramas do not need to be a full 360 degrees. In fact, it may be desirable to restrict the view in cases where the area of interest only occupies a portion of the field of view.
As an example, the focus of the training may be an electrical box safety. For trainees to be able to see potential hazards related to the electrical box, the field of view should be smaller (50 degrees) and focused on the electrical box as opposed to a 360-degree panorama of the shop where the electrical box is located.
EXAMiner can accept custom pictures in a standard format with a typical horizontal field of view of 50 degrees, up to a full 360-degree panorama.
Transferring images to EXAMiner
Adding pictures in EXAMiner first requires transferring the files from the smartphone or tablet to the user’s computer. There are a number of options to accomplish this, but the simplest are email and cloud storage.
Emailing pictures as attachments from the phone or tablet works for a small number of files, but many email servers limit attachment size. For larger volumes of pictures and larger attachments, a better choice is to use a cloud-based option such as Google Drive or Dropbox. Further, setting up a shared space online allows multiple people to contribute pictures easily, and this central repository would be available to any user who has access to the shared folder.
Creating training materials
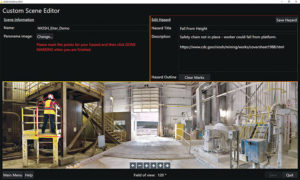
Once panoramic pictures are available on the user’s computer, EXAMiner can overlay hazards and descriptive text on the pictures to generate a site-specific training scene. A menu option in EXAMiner opens an editing page that allows the trainer to create a unique name for the new scene and then select a panoramic picture from their image library. The trainer can then use the software to mark the location of the hazard on the picture to define its boundaries.
Lastly, the trainer can add descriptive text about the hazard that will appear in the training debrief. This text could provide additional verbal context for the hazard or mitigation options, and can include web links to external resources such as relevant Code of Federal Regulations citations, or NIOSH or MSHA supplemental materials on the topic. The trainer can add several hazards to each panoramic picture and save them as one scene.
Final thoughts
Panoramas can be a valuable asset for mine safety training. The extra information in these wide-format pictures can help engage trainees imaginations and provide the framework to encourage lively discussion among trainee groups.
With proper planning and practice, trainers can create and integrate panoramic pictures into their training curriculum using the camera found on a modern smartphone or tablet. While the EXAMiner software is not required to view panoramic pictures for safety training, the ability offered by the software to create customized training scenarios with defined hazards and interactive debriefs provides a significant benefit.
Timothy J. Orr, Brianna M. Eiter, William Helfrich, Jason Navoyski and Michael McNinch are with the National Institute for Occupational Safety & Health (NIOSH). The findings and conclusions in this paper are those of the authors and do not necessarily represent the official position of the National Institute for Occupational Safety & Health, Centers for Disease Control & Prevention. Mention of any company or product does not constitute endorsement by NIOSH.